How to paint a watercolour spring chick in 10 steps
Learn how to paint this cute fluffy chick with me in 10 easy steps, using only a handful of easy-to-find materials.
I’m using watercolour paint and a fineliner pen and an A5 size piece of watercolour paper, but any paint, pen and paper combination will do. You’ll also need a jar of clean water and a paint brush – whatever you have to had is perfect.

Ready to paint? Let's do it.
Step 1.
Boil the kettle for a cup of tea and get all your materials ready while you’re waiting for it to brew. Bring some biscuits too if you like!

Step 2.
Using plenty of water, mix a nice puddle of yellow paint on your palette. If you have more than one shade of yellow, feel free to use both! I have two here.

Step 3.
Start by painting a small-ish yellow circular shape on your paper. Leave a small hole in the middle blank (it will look a bit like a big donut or a bagel). This will be the chick’s head, so don’t make it too big and leave plenty of space for the body! Mine is about the size of a 10p piece. Don’t worry about it being a perfect circle.

Step 4.
Keep going with the yellow on your brush and paint a bigger circle shape underneath the head – and overlapping slightly at the top, so that the head joins to the body. You can make the body as wide and fluffy as you like!

Step 5.
Finish the body with two small triangles of yellow at the bottom.

Step 6.
Let your watercolour dry (this is a good time to tuck into your biscuits) - and don’t worry if it looks a bit weird.

Step 7.
Grab your pen! Add a little beak (a triangle with a line down the middle if you want to keep it simple)...

Step 8.
… and an eye (a short diagonal line, with a c-shape curve underneath will do the trick)

Step 9.
Time for some legs! Draw two simple legs (two lines will do) from the bottom of your yellow triangles. Next add some horizontal lines for feet that look as though they are flat on the ground.


Step 10.
For the final touch, add some feathery details with more yellow paint. You can use short brushstrokes here, following the direction of the body, to give the idea of a fluffy texture!
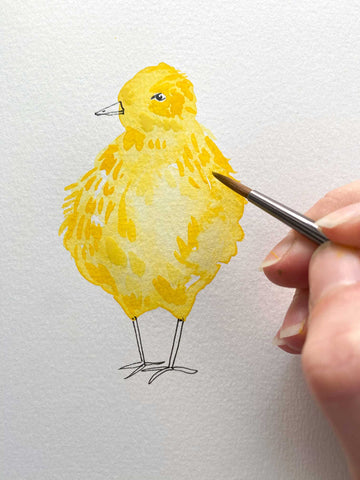
Et voila! Your chick is complete!
I hope you enjoyed painting a chick with me. Tag me in your creations on Instagram @portlandpaper.co or discover lots of other animals living on prints in my shop.